
Simple hair braids run from a 5-minute basic three-strand to a 30-minute infinity pattern, and the right choice depends on whether your hands already know the muscle memory or are still learning. The real cost is not time but tension: too tight brings headaches, too loose collapses before lunch. I still stop two crosses back to undo a wrong strand caught mid-braid, because ripping forward to save time costs more than it saves.
1. Basic Braid
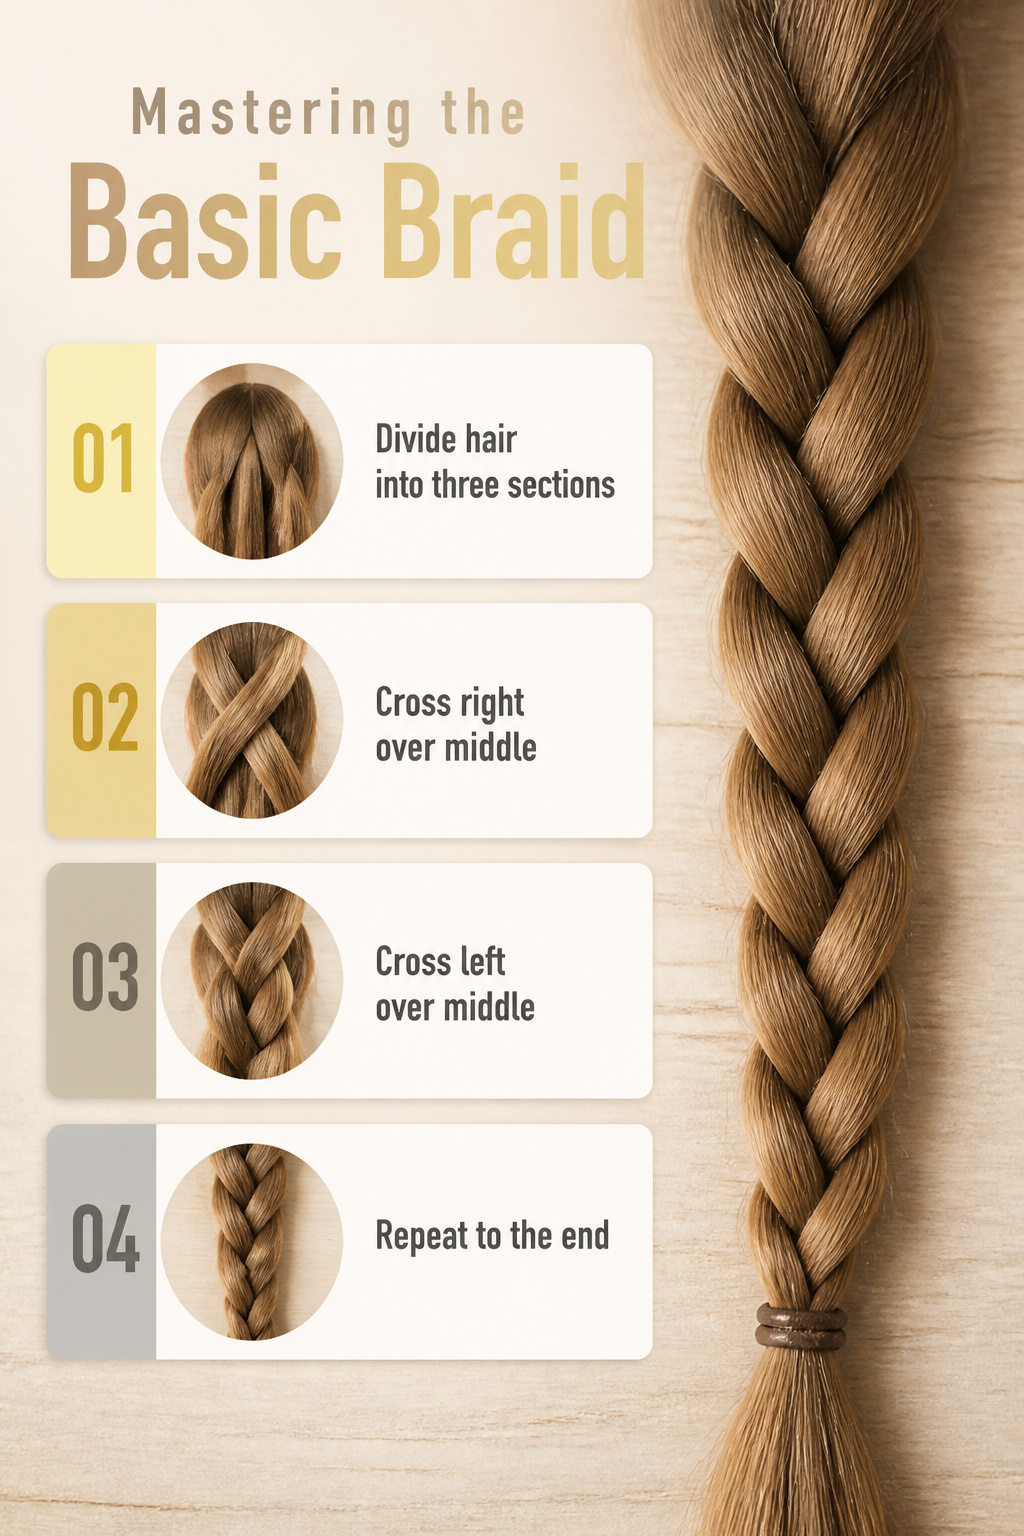
The three-strand braid is the foundation every other style grows out of, and the motion itself is simple once your hands catch the rhythm. Divide your hair into three equal sections. Cross the right section over the middle, so what was right becomes the new middle. Then cross the left section over that middle. Repeat down the length, pulling in the same order each time.
The real struggle is keeping tension even so the braid does not loosen by noon. Too tight and you get a headache; too loose and the whole thing slides apart before lunch. I find it helps to hold the base against my scalp with my free hand while the other two work the strands.
This takes under 5 minutes once the pattern lives in your muscle memory. The first few tries will feel clumsy, and the braid will probably taper unevenly. That is normal. Finish with a small elastic, and you have the base skill that French braids and Dutch braids both require.
2. French Braid
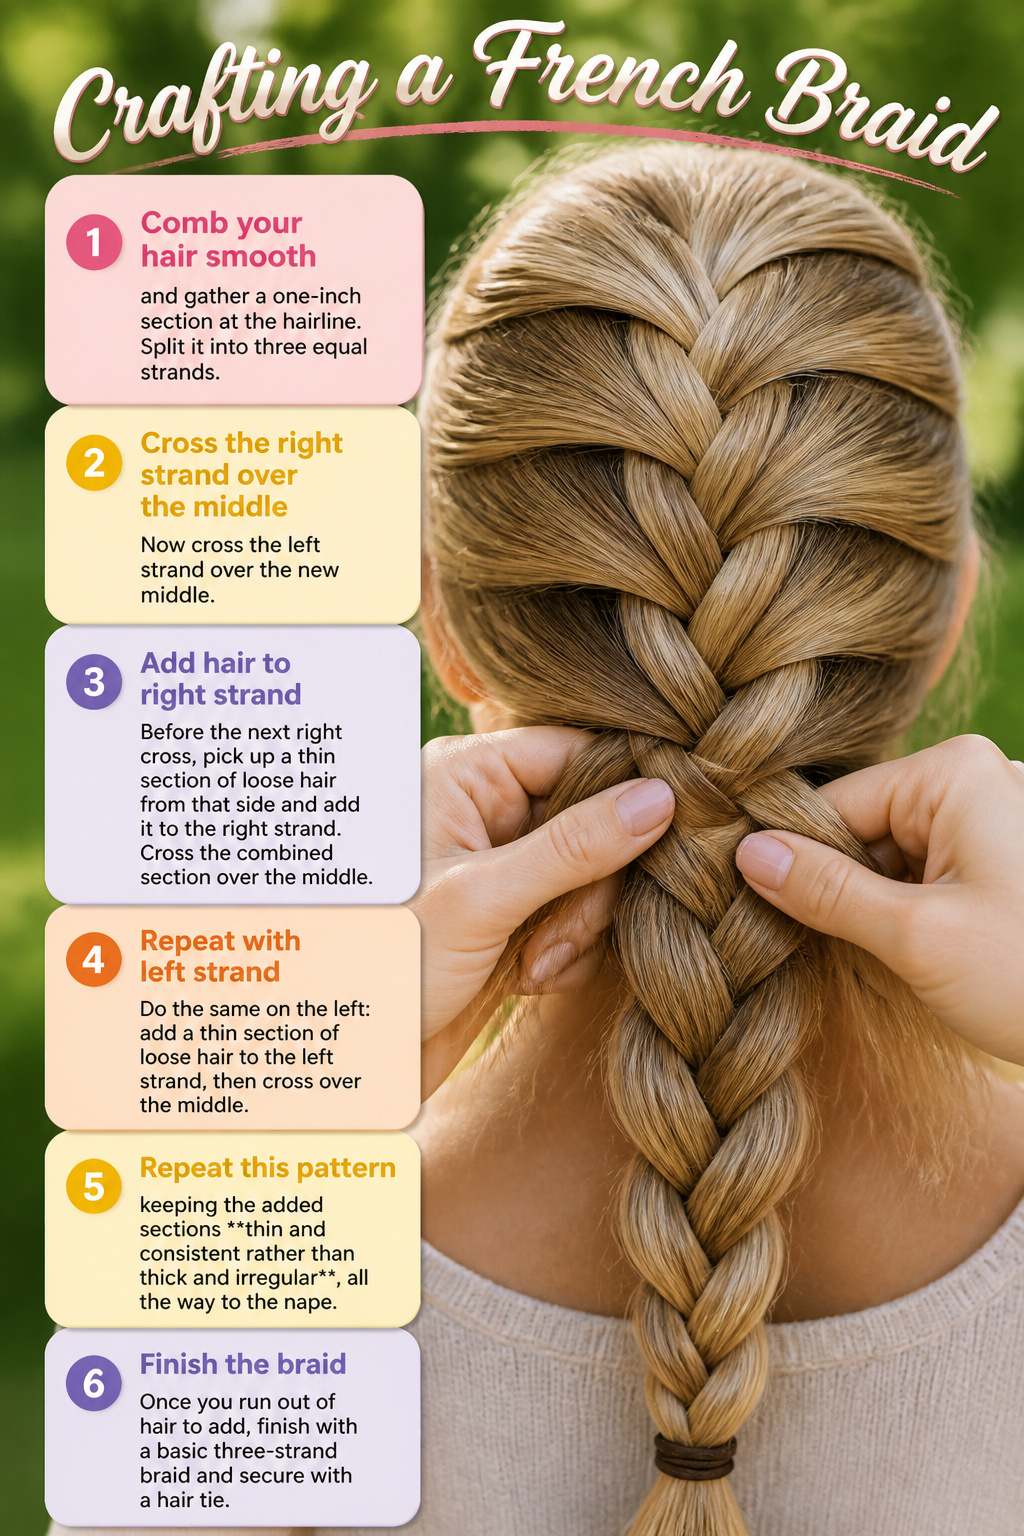
A French braid starts at the crown and works downward, feeding in thin sections from each side as you cross the strands. Medium or long hair handles it best; short hair can work but fights back.
- Comb your hair smooth and gather a one-inch section at the hairline. Split it into three equal strands.
- Cross the right strand over the middle. Now cross the left strand over the new middle.
- Before the next right cross, pick up a thin section of loose hair from that side and add it to the right strand. Cross the combined section over the middle.
- Do the same on the left: add a thin section of loose hair to the left strand, then cross over the middle.
- Repeat this pattern, keeping the added sections thin and consistent rather than thick and irregular, all the way to the nape.
- Once you run out of hair to add, finish with a basic three-strand braid and secure with a hair tie.
This was the first braid that actually stayed put through a full workday for me. The difference came down to those thin, consistent additions; grabbing too much at once leaves gaps and loosens the whole structure by noon. A quick mist of hairspray after securing helps, though it is not required.
3. Dutch Braid
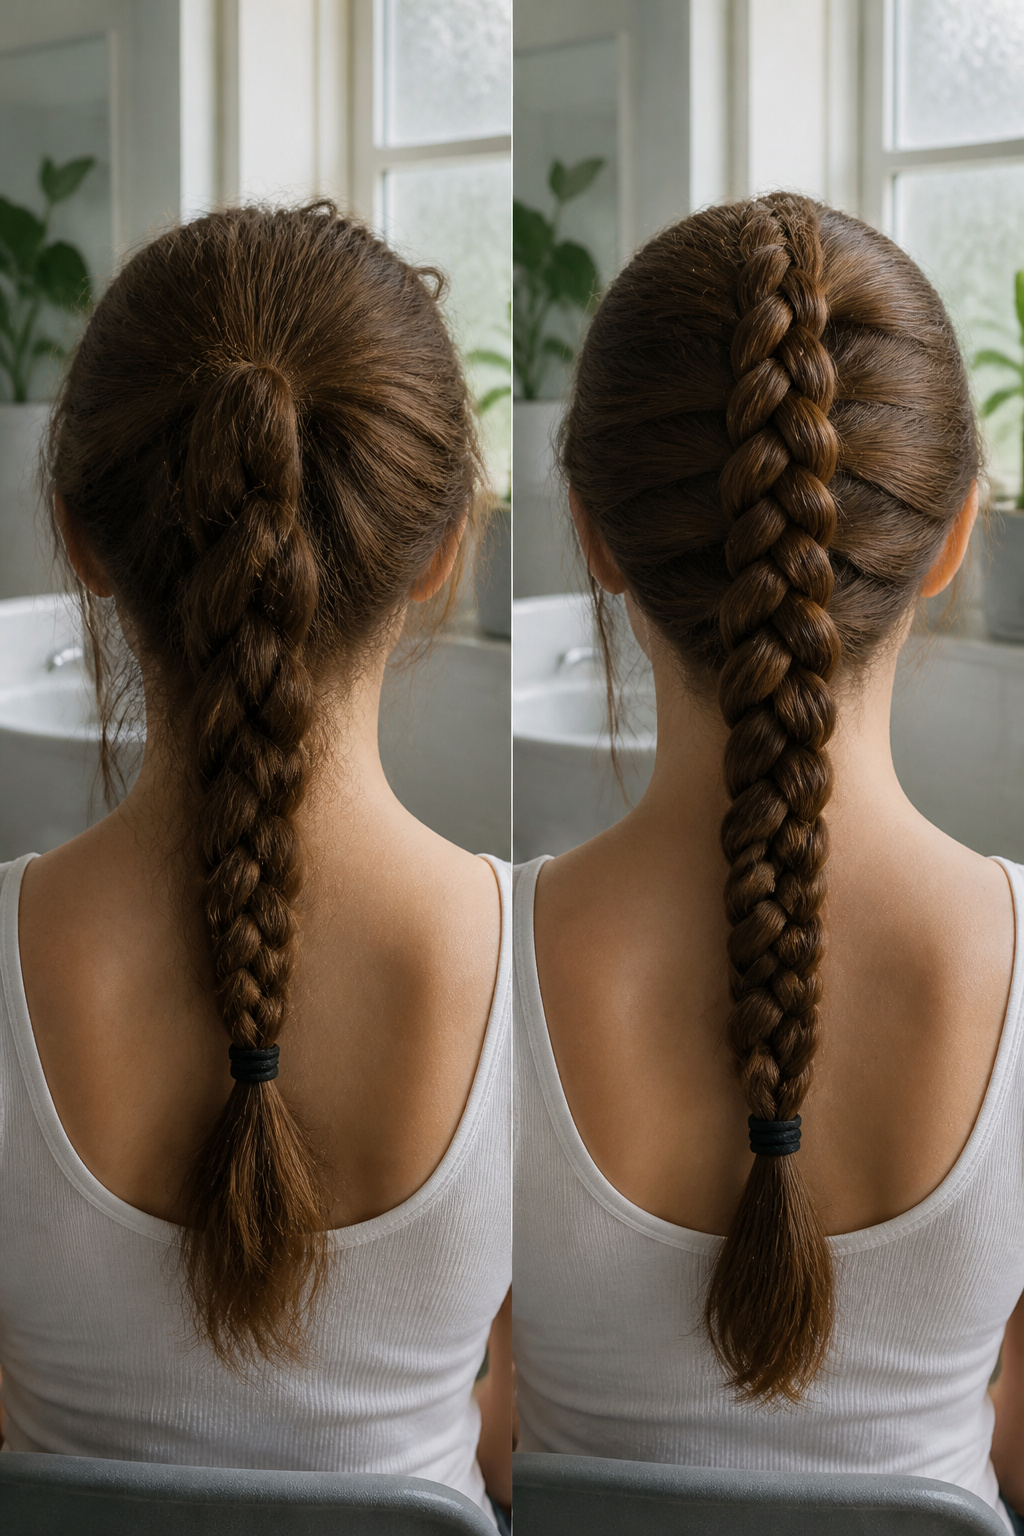
A Dutch braid uses the same three-section start as a French braid, but the outer strands cross under the middle instead of over. That single change creates the raised rope effect that sits on top of your hair rather than blending flat against it.
- Divide the top of your hair into three even sections.
- Cross the left section under the center, then the right section under the center.
- On the next pass, add a small piece of loose hair from the hairline to the left section before crossing it under. Repeat on the right side.
- Keep adding hair and crossing under until you reach the nape of your neck, then braid the remaining length and secure with a hair tie.
The raised profile works especially well for thinner hair that needs visible volume. The whole style takes about 10 minutes once your hands learn the motion. If you catch yourself crossing over by habit, you have slipped back into a French braid; the under motion is the detail that makes this one different.
4. Fishtail Braid

A fishtail braid looks intricate, but the motion is just crossing small sections from the outer edges to the opposite side. Split your hair into two even sections, then pull a skinny strand from the outside of the left section and cross it over to join the inside of the right. Repeat from the right side, grabbing from the outside each time, and keep alternating down the length. The whole thing takes 5 to 10 minutes, depending on how fancy you want to get.
Smaller sections yield a more detailed braid but add time. Once the pattern clicks, the rhythm is simple enough to do while watching television. Secure the end with a hair tie, then loosen the braid by tugging small pieces for more volume if you want it.
5. Pull-Through Braid

The pull-through braid looks intricate, but it is built from small ponytails rather than true weaving. Elastic bands do the structural work, which makes this style forgiving if your fingers are still learning.
- Gather the top section of hair into a small ponytail and secure it with a clear elastic.
- Divide that ponytail into two equal pieces.
- Gather a new section of hair from directly underneath, secure it with another elastic, and let it hang between the two split pieces from above.
- Split the bottom ponytail in half, bring the two sides up and around the lower ponytail, and secure them together underneath with a new elastic.
- Repeat: split the new ponytail, gather fresh hair underneath, and pull the split pieces around it.
- Continue down the head until you reach the nape, then finish with a standard ponytail or tuck the end under.
Fine or slippery hair that escapes traditional braids tends to cooperate here because the elastics anchor each section. The style takes 5 to 10 minutes and holds for everyday wear or something more formal. Curly hair may not flow as smoothly through the sections, so straight to wavy textures see the cleanest result.
6. Crown Braid

A crown braid wraps around the head like a halo and takes under 15 minutes once you find your rhythm. Two approaches work: start at the back and Dutch-braid forward if your hair is long enough to reach, or begin at the front with a classic three-strand braid on each side if it is shorter. The front-start method crisscrosses the two braids behind your head and pins them underneath one another.
The mistake that ruins this braid is pulling too tight. Tension that feels secure at the mirror lifts the whole crown away from your scalp within an hour. What convinced me, reading through a dozen of these tutorials, is that the half-up version rated difficulty level 1 still took extra time just to get the pinning right. Leave the braids relaxed enough to sit flat, then lock them in with bobby pins rather than tension. A little pancake-loosening after pinning hides any gaps and keeps the halo where it belongs.
7. Waterfall Braid

A waterfall braid looks like it belongs on a red carpet, but the mechanics are just a French braid with one change: the bottom strand drops out instead of weaving in, and fresh hair from the top replaces it. That swap creates the cascading ribbon effect that runs along your scalp.
The whole style takes under 25 minutes, the longest of the simple braids here, mostly because you are working slowly to keep those dropped strands clean. A section that falls back into the mix instead of dropping free will tangle the whole cascade, so each drop needs a deliberate release.
- Start with a deep side part and pick up two sections of hair along your hairline.
- Cross the front section over the back, moving it away from your face.
- Take a new section from the top of your head and let it fall across the section you just moved.
- Drop that new section through the twist so it hangs free; this is your first waterfall piece.
- Take the bottom section, pull it over the waterfall, then bring in another new section from the top.
- Let that new section fall through as the next waterfall piece.
- Repeat until you reach the length you want, working one or both sides.
- Finish with a traditional braid on the woven section, secure with elastic, and tuck the end under unbraided hair with a bobby pin.
Short, medium, or long hair all work. Jennifer Morrison has worn this style, and it shifts easily from bridesmaid duty to a casual Saturday.
8. Rope Braid
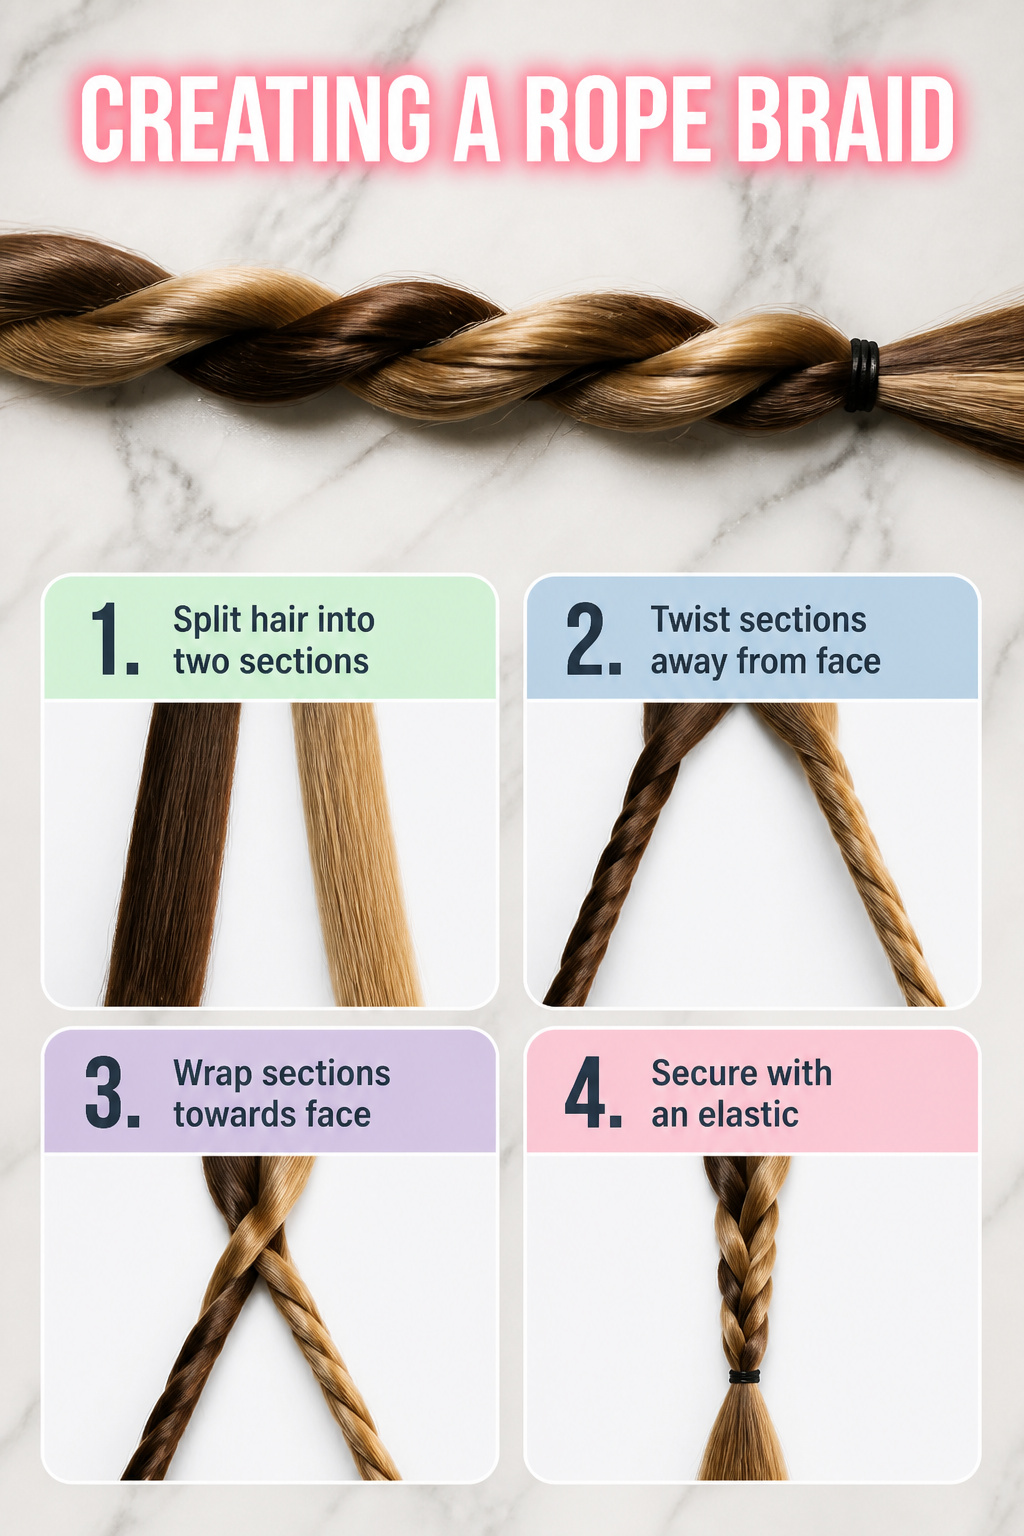
Twisting two sections in the same direction, then wrapping them together the opposite way, is what keeps a rope braid from unraveling. I learned this the hard way the first time I tried it, twisting one piece toward my face and the other away; the whole thing fell apart before I reached my ends.
Time to complete: under 10 minutes, which makes this the fastest secure braid I know for rushed mornings. The motion is also easier on the wrists than three-strand weaving. If repetitive strain is something you manage, the continuous twist-and-wrap puts less pressure through the joint than the constant crossing of a standard braid.
- Split your hair into two equal sections.
- Twist both sections away from your face.
- Wrap the twisted sections around each other toward your face.
- Secure with a small elastic at the end.
9. Infinity Braid

An infinity braid wraps a figure-eight pattern around two base sections, and the result looks far more intricate than the work actually is. The catch is time: plan on 30 minutes or longer, depending how thick your sections are. That estimate already assumes you keep moving without pause, which is where this style edges from simple braids toward advanced territory.
- Part your hair into two equal base sections and clip one aside if that keeps them neat.
- Take a thin strand from the outer edge of the left section and cross it over to the right.
- Wrap that same strand under the right section, then bring it back over to the left, creating a figure-eight loop around both bases.
- Repeat with a new thin strand from the right section, crossing over to the left, wrapping under, and returning.
- Continue alternating sides, keeping each loop tight against the last so the pattern stays visible rather than slipping into a standard twist.
- Secure at the end with a small elastic.
The first three attempts, I stopped twice to untangle the working strand after it looped under the wrong base section. Those pauses pushed each try past 45 minutes. By the fourth attempt, keeping the two base sections pinched between my fingers as the anchor made the figure-eight motion automatic.
10. Double Dutch Braid
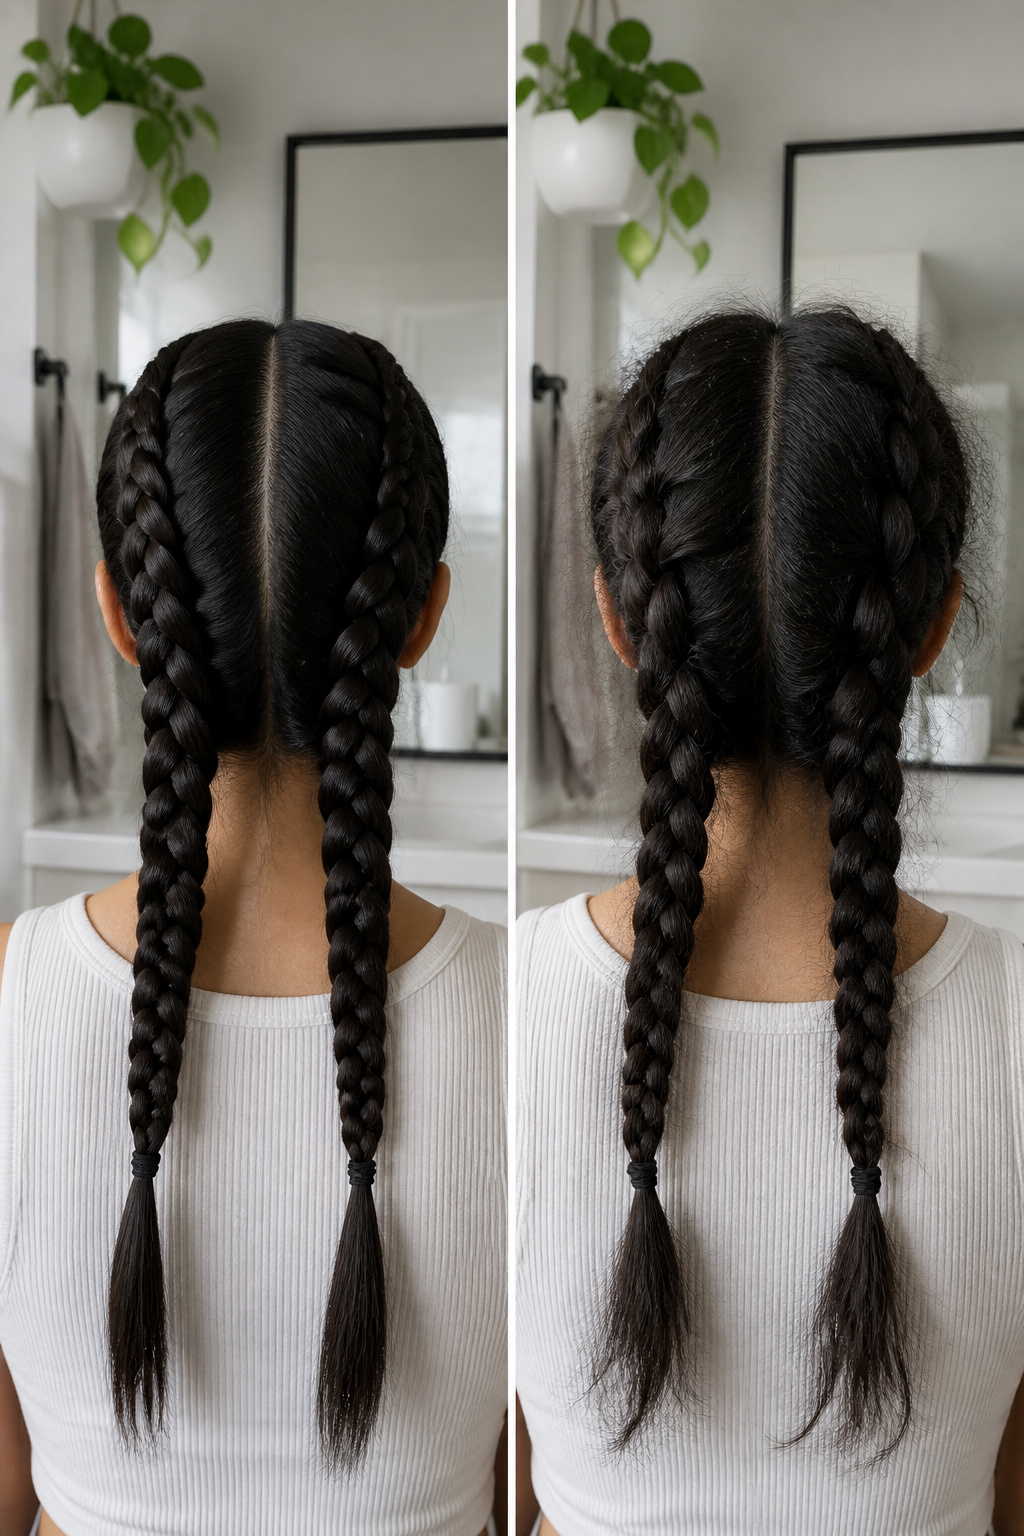
- Part your hair down the middle from the center of your forehead to the nape of your neck, keeping the line straight. Uneven sections here throw off the whole look, so I check the part in a second mirror before I start braiding.
- Clip one side out of the way and divide the loose side into three even sections behind your ear. Smoothing a quarter-sized amount of gel through towel-dried hair first keeps the braid defined and frizz-free.
- Braid in a left-under, right-under pattern, weaving each outer section under the center and adding small pieces of loose hair as you go. This is the inverse of a French braid.
- Pull each section tight as you work. Too loose and the braid falls out; too tight, and you can gently massage it or pull the sides after you tie it off.
- Secure with a clear elastic or one that matches your hair color, then repeat on the other side.
Two Dutch braids take 15 to 20 minutes and distribute weight evenly, which matters for thick hair that strains in a single braid.
11. Messy Braid

A messy braid is not a separate braid at all. It is what happens after the braiding is done, when you go back in and deliberately loosen what you just built. The technique works on almost any of the braids in this list, though it behaves very differently depending on which base you started with.
Braids hold their shape best with some grit in the hair, so this finish is actually easier on second- or third-day hair than on freshly washed strands. The natural oils give the sections something to grip, and the loops you pull stay where you put them instead of sliding loose within the hour. If your hair is clean, a light texturizing spray at the roots helps create that same hold.
The pulling itself is simple. Work from the bottom of the braid upward, tugging each crossover loop outward a little at a time. Flat sections become rounder; tight plaits take on volume. The mistake most people make is stopping too late rather than too soon. Three loops pulled too far, and the braid collapses from artfully undone into simply undone. You can always pull more; you cannot push the hair back in.
I find this finish most forgiving on Dutch braids and basic three-strand braids, where the structure is sturdy enough to survive the distortion. Fishtail braids, with their thinner strands, can look stringy rather than textured if you pull too aggressively. The line between the two is thinner than it looks.
12. Triple Braid

Three small braids braided together sounds fussy until you realize how much bulk it adds. Fine hair that vanishes into a single standard braid suddenly holds its own, and the trick is simpler than it looks.
- Part your hair into three clean vertical sections, top to bottom or left to right depending on where you want the finished braid to fall.
- Braid each section separately with a basic three-strand. Keep the tension identical on all three; mismatched tightness is what makes this look like a mistake rather than intentional texture.
- Gather the three finished braids and braid them together as if they were single strands.
- Secure the end and smooth flyaways with hairspray if needed.
The base style you use for each of the three starter braids changes the time and the final look. Three basic braids take minutes. Three Dutch braids underneath take longer but give you a completely different result. The only non-negotiable is matching the tightness across all three component braids, or the whole thing skews lopsided by noon.
What I Keep Within Reach
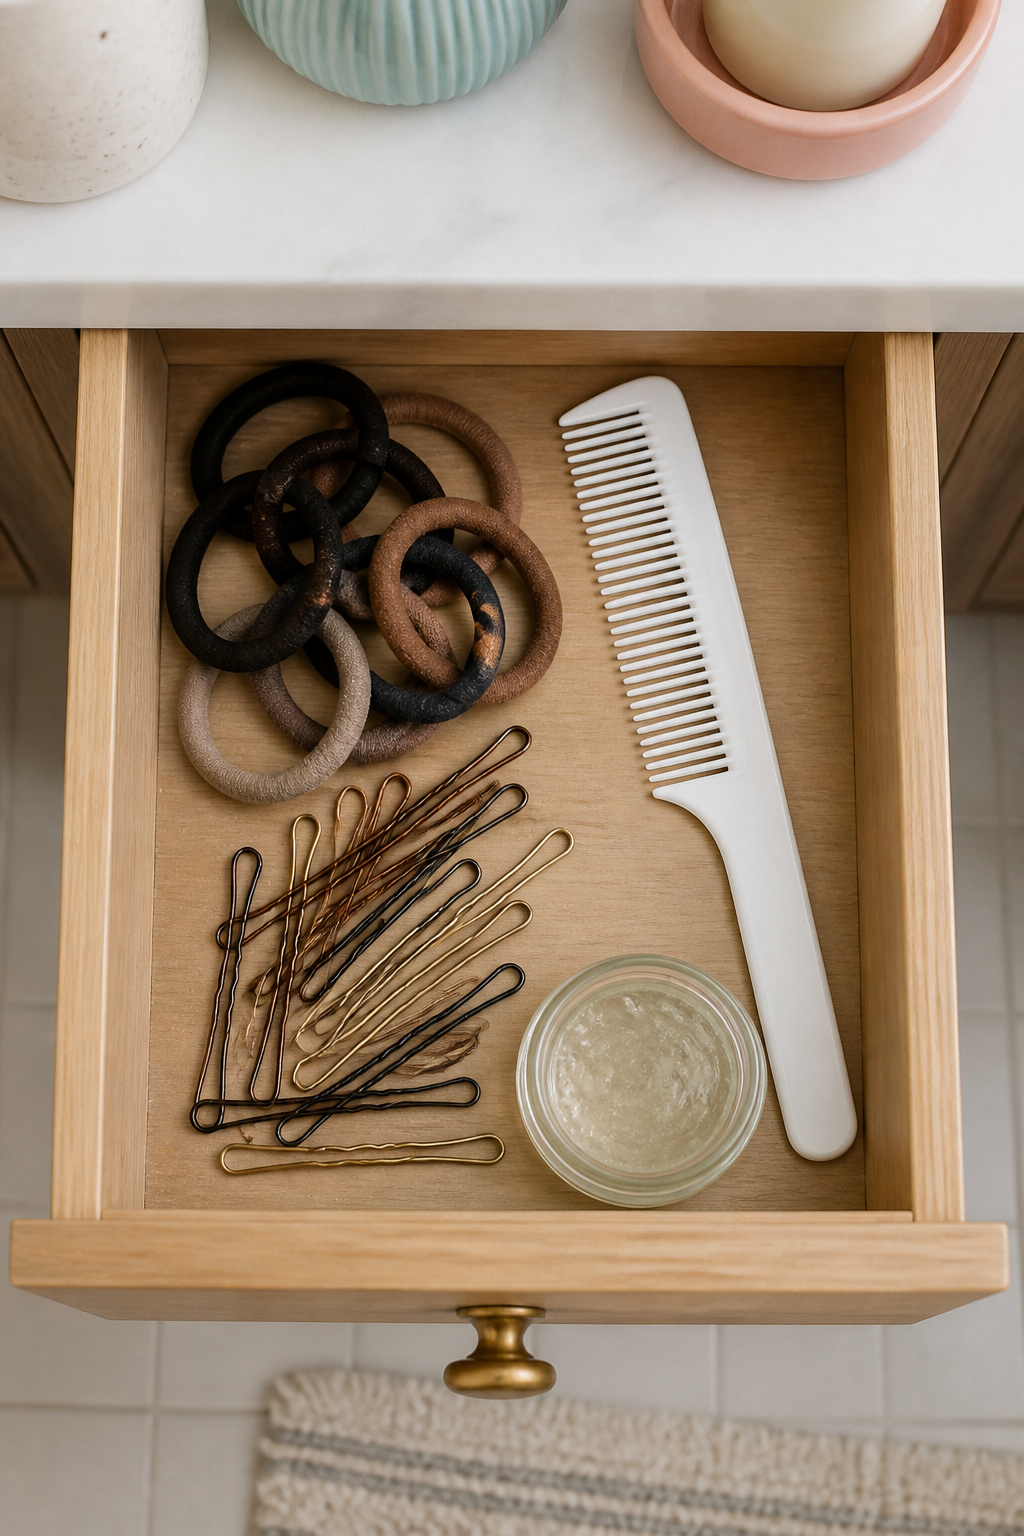
A drawer in my bathroom holds the same five items every braiding morning. Hair ties without metal seams sit on top, since the seam is what snags and splits the strand you are about to weave. A fine-tooth comb lives next to them for parting clean sections; without it, the three strands start uneven and the braid loosens by noon. Bobby pins that match hair color hide underneath, the kind that disappear against dark or light rather than announce themselves.
For smoothing, a quarter-sized amount of hair gel worked through towel-dried hair keeps the plait defined and frizz-free. Leave-in conditioner does the same job with less hold. The gel question matters more than I expected: check the ingredient list for alcohol, which dried my ends over a month of daily use. The 35-54 readers this piece serves will want that label read before buying, and they are right to.
Which Braid for Which Hair
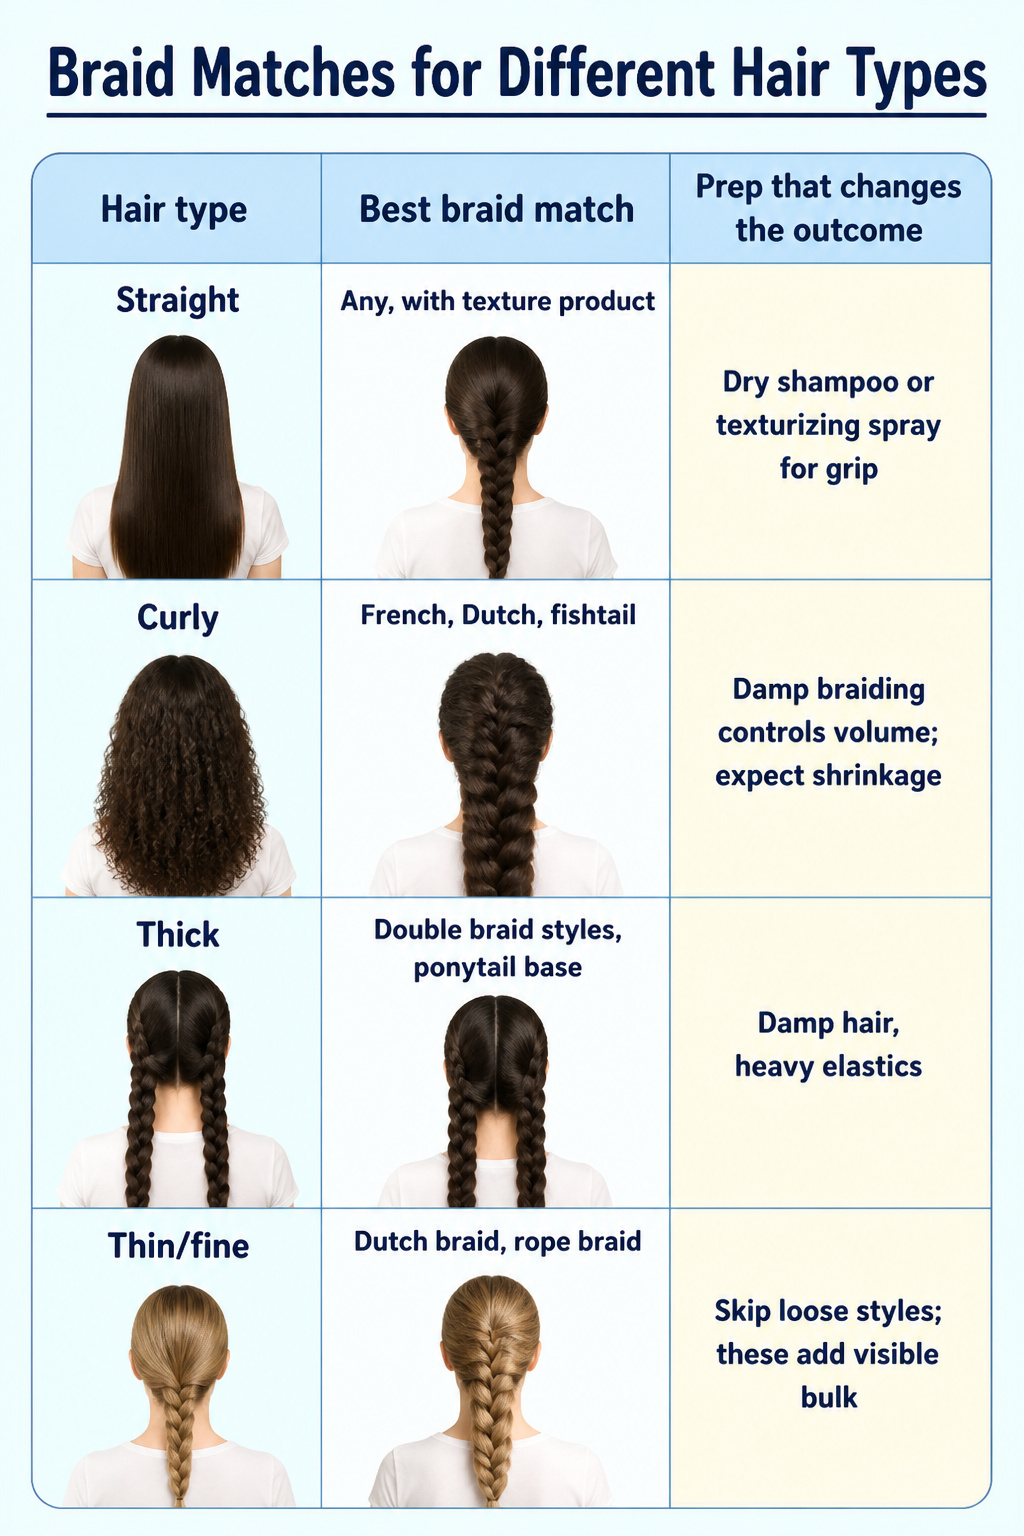
Straight hair was my first braiding enemy. The strands slip against each other, so a basic three-strand unravels before I can even reach for an elastic. Dry shampoo or texturizing spray on the lengths first gives the grip that smooth hair lacks. Curly hair braids faster because the strands already hold together, though the finished braid sits shorter than it looks while loose. Thick hair needs the heaviest-duty elastics; standard ones snap or slide, and a damp start keeps the volume manageable. Thin or fine hair is where Dutch braids and rope braids earn their keep. Both pull the structure outward so the braid itself reads as fuller hair.
| Hair type | Best braid match | Prep that changes the outcome |
|---|---|---|
| Straight | Any, with texture product | Dry shampoo or texturizing spray for grip |
| Curly | French, Dutch, fishtail | Damp braiding controls volume; expect shrinkage |
| Thick | Double braid styles, ponytail base | Damp hair, heavy elastics |
| Thin/fine | Dutch braid, rope braid | Skip loose styles; these add visible bulk |
Where I Still Slip Up

Tension headaches from a braid yanked too hard are a real recovery lesson. The fix is gentler than restarting: slide the tail of a comb under the tightest cross and lift slightly, working from the nape upward. Two or three lifts usually slacken the pull without loosening the pattern.
Uneven sections throw off the whole rhythm, and your fingers feel the lump before the mirror confirms it. Parting with the comb first, even a rough guideline, keeps the three strands balanced as you work. I still skip this when I’m rushing, and I still regret it.
The wrong strand caught mid-braid is the one that unravels three inches down. Stop, undo two crosses back, and resume from there. Ripping forward to save time costs more time. Two crosses is the minimum that resets the weave cleanly; one leaves the mistake buried, and three wastes the work already done.
Frequently Asked Questions
How do you do a basic braid?
Divide your hair into three equal sections, then cross the right section over the middle so it becomes the new middle. Cross the left section over that middle next, and repeat down the length. Keep tension even so the braid stays secure without giving you a headache, and finish with a small elastic.
What is a Dutch braid?
A Dutch braid is built by crossing the outer strands under the middle section instead of over it, which creates a raised rope effect sitting on top of your hair. You start with three even sections at the crown, then add small pieces of loose hair from each side as you continue the under-crossing pattern down to the nape. The whole style takes about 10 minutes once your hands learn the motion.
How long does it take to do a fishtail braid?
A fishtail braid takes 5 to 10 minutes, depending on how small you make each section. Smaller pieces create a more detailed look but add time. The motion is just pulling skinny strands from the outer edge of one section to the inside of the opposite section, alternating sides down the length.
What tools do I need for braiding?
You need hair ties without metal seams, a fine-tooth comb for clean parting, and bobby pins that match your hair color. A quarter-sized amount of gel or leave-in conditioner helps keep the plait smooth and frizz-free. Check gel labels for alcohol, which can dry out ends with regular use.